With the ShippyPro connector you can connect iPacky and ShippyPro directly. This means that you don’t need to go into another app to create the shipping labels, but can get it directly after checking the order.
About ShippyPro
We’re excited to announce that iPacky has partnered with ShippyPro to deliver a seamless and scalable shipping experience directly within iPacky’s native platform.
With ShippyPro’s multi-carrier technology integrated into iPacky, merchants gain access to a global carrier library of 200+ shipping providers, making it easier to design, manage, and optimize logistics operations across domestic and international markets.
Users can compare real-time carrier rates, generate and print labels and manage fulfillment activities inside their existing workflow—without switching systems or relying on manual processes.
For companies with international ambitions, cross-border complexity, or a global customer base, this partnership brings a significant advantage. ShippyPro is built to support businesses operating across multiple countries and shipping models, offering the carrier breadth, routing flexibility, and operational control needed to scale globally.
Whether a merchant is shipping within one market or orchestrating deliveries across several regions, the platform helps create a more efficient, reliable, and cost-effective logistics operation.
With the iPacky ShippyPro connector, you will stay in the iPacky interface all the time, with no need to switch to the Shippo user interface.
It’s very flexible and powerful. You can change carrier/service, number of parcels, shipping address and properties on the shipping. Such as Signature required or insurance. It also supports Shopify locations for shipping from different locations and partial fulfillments.
For this to work, you need PrintNode installed.
In order to use this connector, you need to have a working ShippyPro subscription and the ShippyPro Shopify app. You also need to add the ShippyPro connector in Connectors. You also need to talk to ShippyPro for iPacky to have access to the API in your store.
After setting up ShippyPro, you must add the ShippyPro connector in Connectors→Manage. After that, the ShippyPro connector will appear when you expand the Connectors, and you can select it.
Setting | Description |
|---|---|
API key | The API key from the ShippyPro web interface. Settings→Integrations→API |
Unit | The weight unit you want to be used in the shipping dialog |
Default country of origin | The two letter country code, for example US. This is used when the product in Shopify does not have country code of origin |
Default HTSUS | The default US customs HS code to be used when the this is not registered on the product when sending to the US |
When sending to the EU, use the HS code for this country code | Select the country code to match with the HS code for a country in Shopify for the variant when sending to the EU |
Default item weight (KG) | The product weight that will be used if the product weight in Shopify is 0. |
Sender address | The sender address to use |
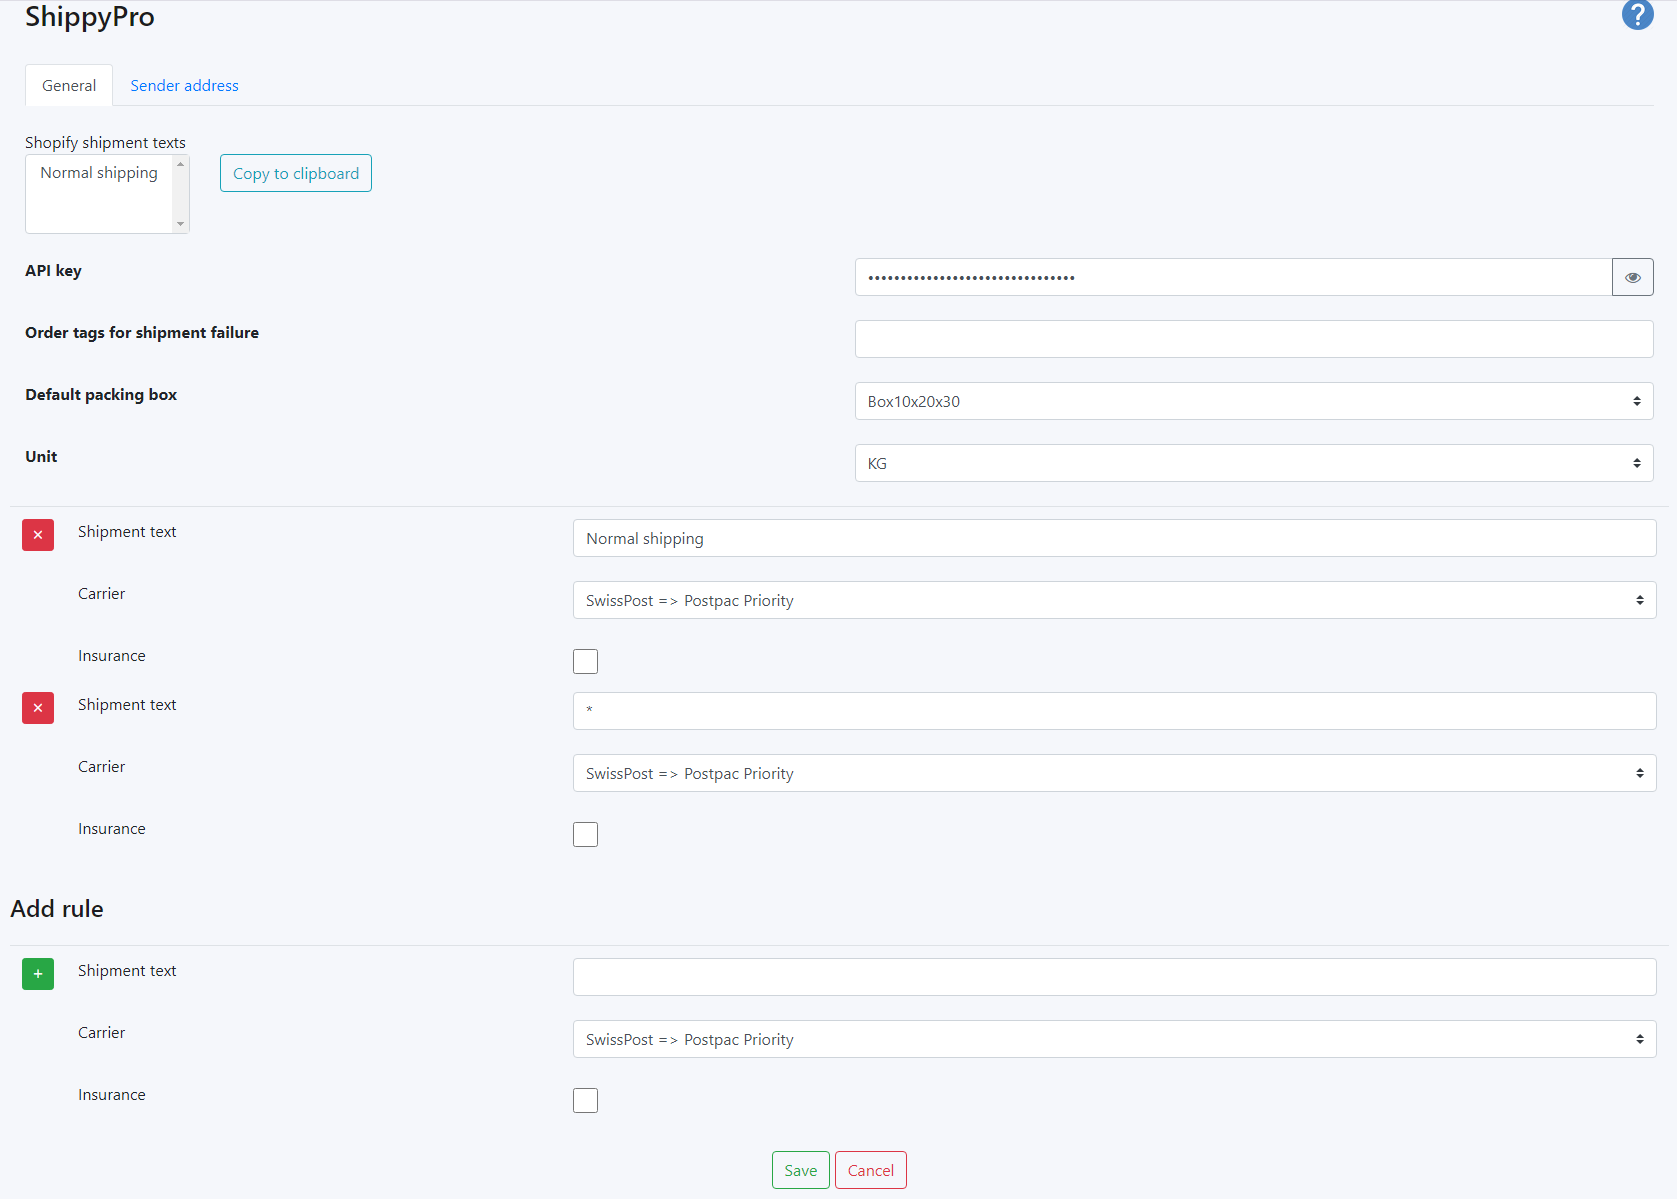
You should also enter at least one packing box size in Dashboard->Tools->Boxes, and set one as default.
- Shopify’s shipment texts will show a list of delivery types. These are all the available shipping rate texts in the Shopify admin. By selecting a text here and clicking on the Copy to clipboard, you can paste this text into the Shipment text. That way, you will be sure not to make spelling mistakes. There might be texts that are not listed here, such as pickup at a store. The text for that will be different for each store. This text can be found on the order.
- To add a rule, fill in the fields in the Add rule section, click on the + button, and then click Save.
- To delete a rule, click on the X button.
Setting | Description |
|---|---|
Shipment text | The shipment delivery text selected at checkout on the order. The match must be exact and is case sensitive. Wildcards are not supported. A * (by itself) means that this rule will be applied when no match is found in the other rules. If this is not specified no rule processing will be performed if a matching rule is not found. |
Carrier | Which carrier to use. The carriers available are the ones set up in your ShippyPro portal. |
Insurance | If shipping insurance is being used. |
The rules are used as a default for the shipping dialog when the order check is complete, and can be overridden there.
Also remember to fill out the Sender address tab.
Save the changes.
In order for this shipping connector to be used, you also have to set the Fulfillment rules.
Please note that first the Fulfillment rules are matched, and then the ShippyPro rules. If there is no match on Fulfillment rules where the Label drop-down should be set to ShippyPro, it will not reach the ShippyPro shipping rules match and ShippyPro will not be used.
At the end of an order check (and if ShippyPro based on rules is selected as the handler), a dialog like this will appear:
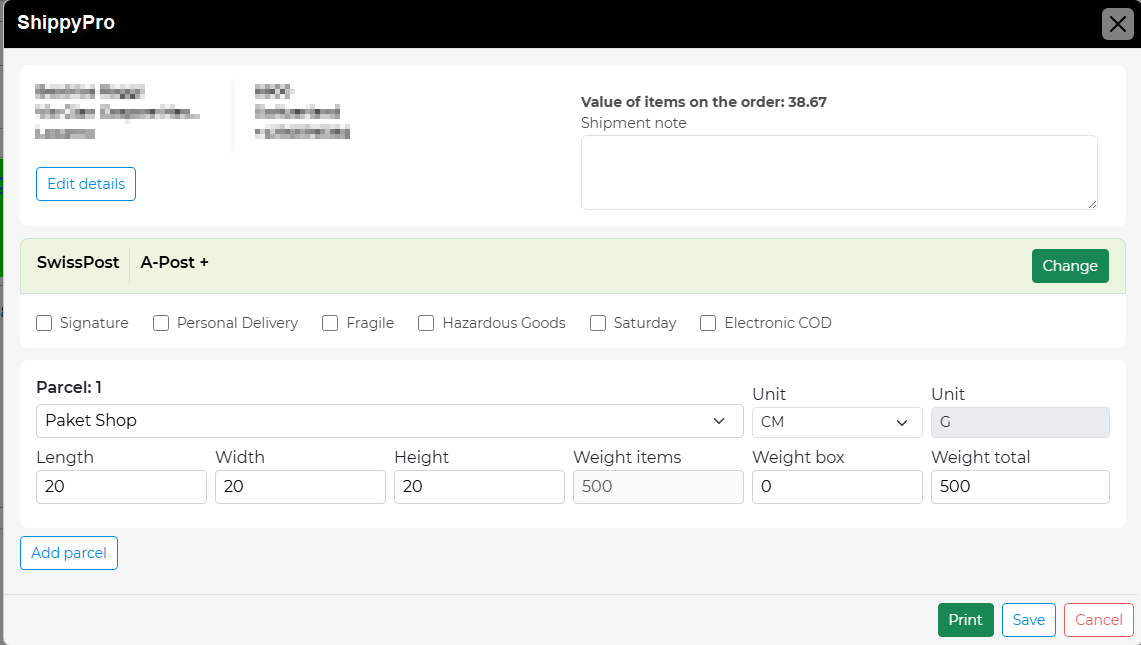
Here you can select the dimension and weight of the shipment. The Box drop-down shows the boxes defined in Dashboard→Tools→Boxes.
The Shipment note is used to write a note to the carrier. This might not be visible with all carriers.
Parcels can be added by selecting Add parcel. Delete it again by using the trash can icon. Please note that the carrier/service you have selected might not support multiple parcel shipments.
By default, it will use the shipping rules set up in the iPacky ShippyPro setup, and it shows the available shipping methods and their price.
If you make changes to any dimensions or properties, click on the Change button to get updated available shipping methods since they might have changed.
Select the shipping method you want to use, and click on Print.
The shipping label will be printed.
If any errors during shipping label generation, they will be shown here.
If for example message about address validation error, you can edit the shipping address on the iPacky order check screen. And then Retry shipping label from the Actions drop-down.
Troubleshooting
- Check that the API key is correct. If it works once, it should work forever, unless you change the API key in ShippyPro portal.
- If the label is not printed, check that PrintNode is up and working and that the printer is turned on. Also check the print queue in View PrintNode jobs.