Main screen→Menu→Picking lists/Packing slips
Process picking lists/packing slips with all the extra info that iPacky can provide.
By using the built-in picking lists/packing slips, you might not need an extra app for that.
The packing slip can be printed automatically at the end of the order check if you have PrintNode installed.
The difference between picking lists and packing slips is that picking lists can contain more information for internal use. Be aware that some information here (time line comments, virtual products/bundles, product notes) should not be given to the customer. Use packing slips for that. If you don’t show any internal information, the picking list can be used for both picking and as the packing slip for the customer. We recommend not using a packing slip, but that the customer gets the order confirmation electronically by email. This saves paper, and costs.
Based on the choices you have made in Dashboard→Settings, the picking list can print:
- Order note
- Order tags
- Timeline comments
- Order line custom attributes
- Added SKUs from order check rules
- Virtual products/bundles content
- Product notes
- Default options can be set in Dashboard→Settings→Defaults. The font size for the order details lines for picking/packing lists can be set there also. If you are logged in through iPacky Dashboard with Supervisor role or higher, there will be i settings icon in the header that redirects to Settings.
Most of these will not be available if you print out picking lists in other apps. Ours will basically print out the same information that you get when you open the order for check in iPacky.
The sorting of the order lines on orders is specified in User settings. Remember to turn on the Show bin location in Dashboard→Settings→View. To sort on the bin location, set Dashboard→Settings→Layout→Sort order lines on to sort on Bin location. Also check that all users have the setting of (Settings) to use the same setting, or set in manually to sort on bin location.
If you are using batch picking print or on screen, you can also use the picking box# feature. This is used when you pick using for example a trolley with boxes to put the items for each order in. iPacky will then designate a box number to each order. This way it’s much faster to check the order later since all items for an order are in a single picking box. Set in Dashboard→Settings→View→Show picking box#.
Overview
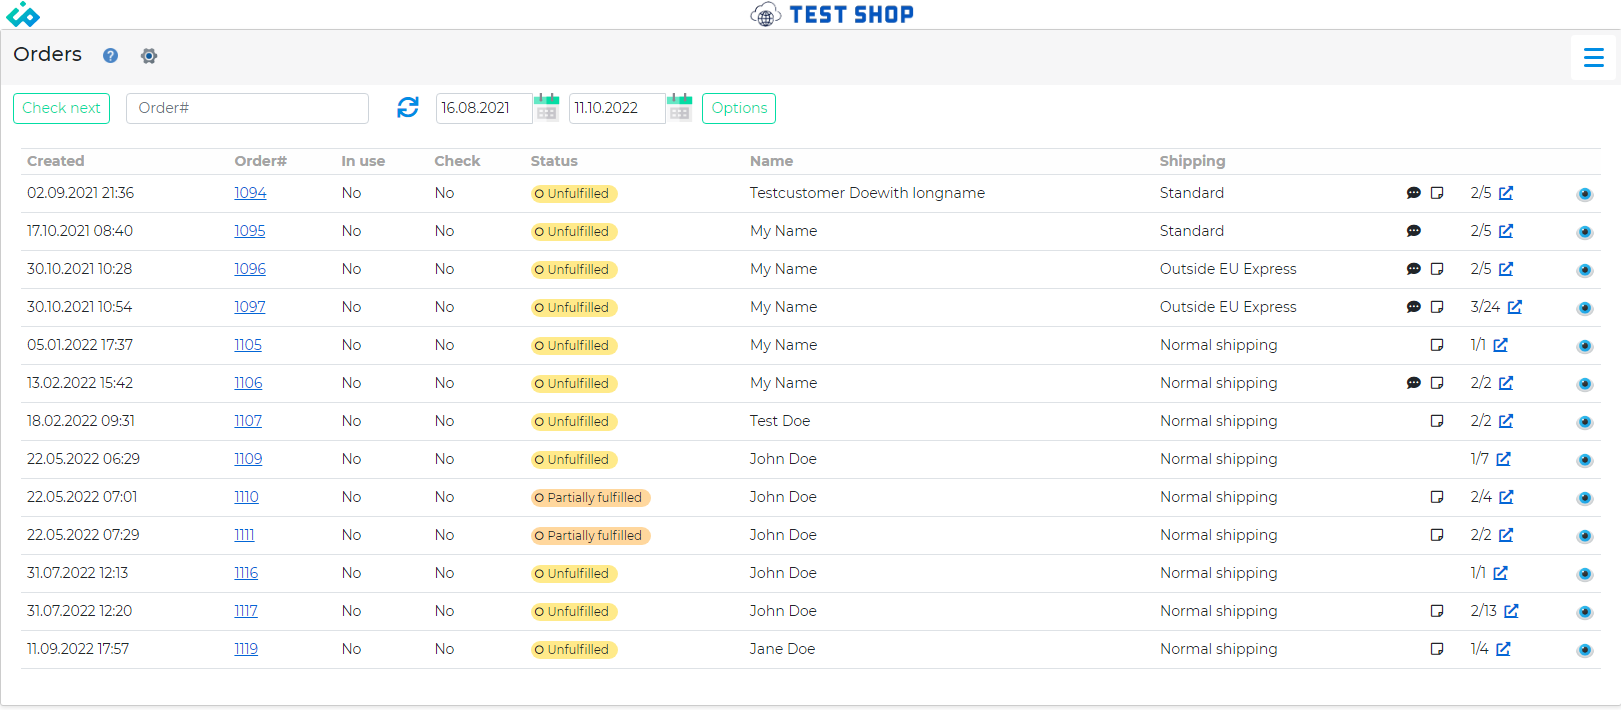
By moving the mouse over the order# you will see a popup with the order line details. By moving the mouse over the name column, you will see a popup with the shipping address details. By moving the mouse over the packers note, and customer’s note icons (if any) you will see the contents. Packers note and customer’s note can be edited in the preview order (eye icon) dialog.
If you also want to see the country the order will be shipped to, you can turn that on in Settings→View
To print, follow the next steps:
- Filters and options can be set under the Options drop-down.
- Select the date range. By default, it will go back 7 days. The date range is from date, and less than to date. The default days back can be set in Dashboard→Settings→Defaults. It will also remember the start/end date range in the session.
- Click on Go, and it will show a list of matching orders.
- To search for a specific order, disregarding the date range, just type or scan the order in the Order# field and press Enter.
- The column with the number/number shows the number of order lines and items on that order. The eye icon will show a preview of the order.
- Select the orders you want to print by clicking on the checkbox on each line, or the select all checkbox in the table header. It will show the number of orders selected, and the total number of items on the selected orders.
- If you want a batch picking list, you can check the Batch checkbox. This will make the printed list a summary list for all the items in the selected orders. Very useful when picking items for a batch of orders.
- By clicking on the Print drop-down button you can select Picking lists or Packing slips, it will generate the lists, ready to print. This might take some time depending on how many orders will be printed. It will also mark them as picked. If you have set up PrintNode you will also get an option to print the packing slips using PrintNode. This might be faster, and will also give you the option to print picking slips on a smaller media (shipping label).
The settings icon will be shown in the header if you are logged in through the iPacky Dashboard, and you have the role of Supervisor or higher in iPacky. By clicking on this icon, you will go directly to Settings⇾Defaults
Select a predefined number of orders
In order to have iPacky select a certain number of orders instead of manually doing so, you can specify that in iPacky Dashboard→Settings→Defaults→Show a button with selection of a number of orders. If this value is filled out with a value larger than 0, a button will appear in the overview that will select this number of orders.
Print drop-down
Item | |
|---|---|
Picking lists | Prints picking lists for the selected orders. |
Packing slips | Prints packing slips for the selected orders. |
Both | Prints both picking lists and packing slips for the selected orders. |
Bulk print batch | Will print batch picking lists in bulk of a specified number of orders in each bulk instead of manually printing each batch separately. After clicking on this, iPacky will ask for the number of orders in each bulk (default is 5). This means that you can print out batch picking lists in which each batch has this number of orders in it. The source is the selected orders. |
Packing slips with PrintNode | Prints packing slips for the selected orders using PrintNode. Only available if PrintNode is connected. |
Make list of orders | See the tip regarding Make list of orders. |
Small address labels | Prints small address labels for the selected orders. This is not shipping labels, but a small address label with only the shipping address. |
Product summary to Excel | Will export a summary of all products in the selected orders to Excel. Very useful for having a report of all the products picked. |
Local delivery labels with PrintNode | Will print local delivery labels for the selected orders using PrintNode. |
Small address labels with PrintNode | Prints small address labels for the selected orders using PrintNode. This is not shipping labels, but a small address label with only the shipping address. Only visible if PrintNode is connected. |
Small order info labels with PrintNode | Prints a small address label with primary info about the order after the order check. This info is: order number barcode, order number and customer name. The print is done on the small address label printer. |
Options
Defaults for most of these options can be set in iPacky Dashboard→Settings→Defaults.
There you can also define Presets. That means that you can define some filters on that preset, and this can be quickly loaded here in Options. For example tag filters.
Option | |
|---|---|
Open only | Only shows open orders |
Already printed | If unchecked, it will only show orders that the picking list has not been marked as picked |
Partially fulfilled only | Will filter on only partially fulfilled orders. Open only must be turned on for this to have any effect |
Already checked | If checked, orders that has already been checked are shown |
Batch | Summarizes order line quantities for a batch of orders in picking lists. Does not apply for packing slips |
Ungroup virtual products | Only applies when not batch. Will show the virtual product members without the virtual product group header. Especially useful when using bin locations to get them in correct picking order. Does not apply for packing slips |
Show product photo | Choice to show product image on picking list. Does not apply for packing slips |
Fast mode | If less than 25 orders selected for print this can speed up the retrieving of the order data to be printed. If this fails, turn it off. |
Paid only | Will only show paid orders. |
Hide order details in batch | When print out batch picking list or showing it on screen, it will hide the order details and quantity for each product line. |
Show max | Maximum number of orders to show |
Only with order tags | Only include orders with these tags. Type in a tag and press Enter. It will also show a list of existing tags you can choose from after starting to type. Delete by clicking the X on an existing tag. |
Exclude order tags | Exclude orders that have these tags. This overrides the include tags, if the tag is listed there also. Type in a tag and press Enter. It will also show a list of existing tags you can choose from after starting to type. Delete by clicking the X on an existing tag. |
Max orders lines per order | Only show orders that has this number of order lines or less. 0 means ignore this filter. |
Max items per order | Only show orders that has this number of items or less. 0 mean ignore this filter. |
Minimum items per order | Only show orders that has this number of items or more. 0 means ignore this filter. |
Sort order lines on | How to sort the orders listed. Created means sort on the date the order was created, old to new. Customer means that the orders will be sorted on customer. This means that you will see all orders from the same customer grouped together. Default is Created. |
Handle as fulfilled | If this is turned on, you can re-print fulfilled orders even if you are not fulfilling orders before iPacky. This is only ment to be used very seldom in case you need a re-print. If you are fulfilling the orders before iPacky, this should be set in iPacky Dashboard→Settings→General. Please not that if there are multiple fulfillments, it will only print the latest one. |
Print labels | Prints out labels with the order numbers selected. |
Reset picked status on selected orders | This is used to set selected orders as not picked. |
Troubleshooting
If an order is not shown, the most likely reason is the date range, or the options. Also note that when an order is printed, it will be marked as picked, and it will not be shown again. This is by design, and can be changed in Options. You can also type in the order number, then it will always be shown, and you can look at the statuses/filters why this is not shown.
Screen
A very powerful functionality to do on-screen batch picking where you can pick and check at the same time on a mobile device. No waste of paper.
Picking lists assignment
Turn on this functionality in Settings→Options→Assign picking lists.
The Picking lists/packing lists screen can then look like this
If the logged-in user has Operator role or higher and have logged in through iPacky Dashboard, it will show the assignment controls. Other users will see unassigned orders only. Orders assigned to them will be in the main menu→My picking lists.
Assigned to
Filters on the assignment status of each order. (None) = unassigned orders, (All) = unassigned and assigned orders, (Assigned to) = assigned orders, username = orders assigned to the specified user.
Assign selected to
Select orders, choose from the users in the Assign selected to drop-down. The selected orders will then be assigned to the specified user, and will appear in the user’s My picking lists. By choosing (None) it will unassign those orders.
Orders assigned to users will be in the main menu→My picking lists.
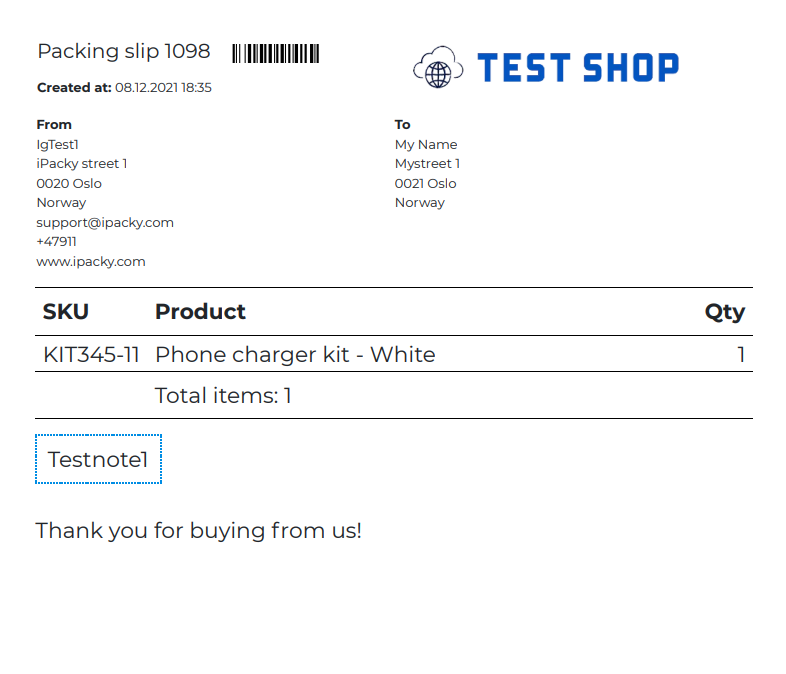
Options/translations for packing slips
Options and translations for packing slips can be set in Settings→Packing slip
This makes it possible to set the texts you want on the packing slip in your language.
Example packing slip
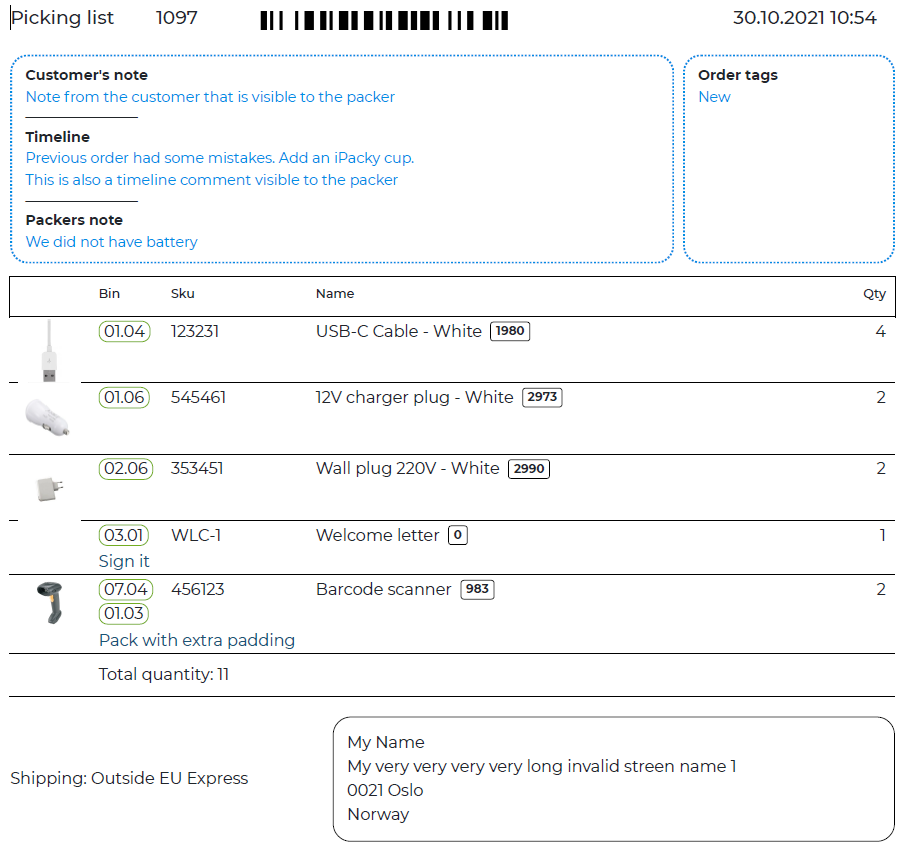
Individual picking list
The sellable quantity from Shopify can be shown (the number at the end of each order line). Settings→View→Show available quantity in picking list
Bin locations are also shown in the Bin column if bin locations are turned on. Settings→View→Show bin location
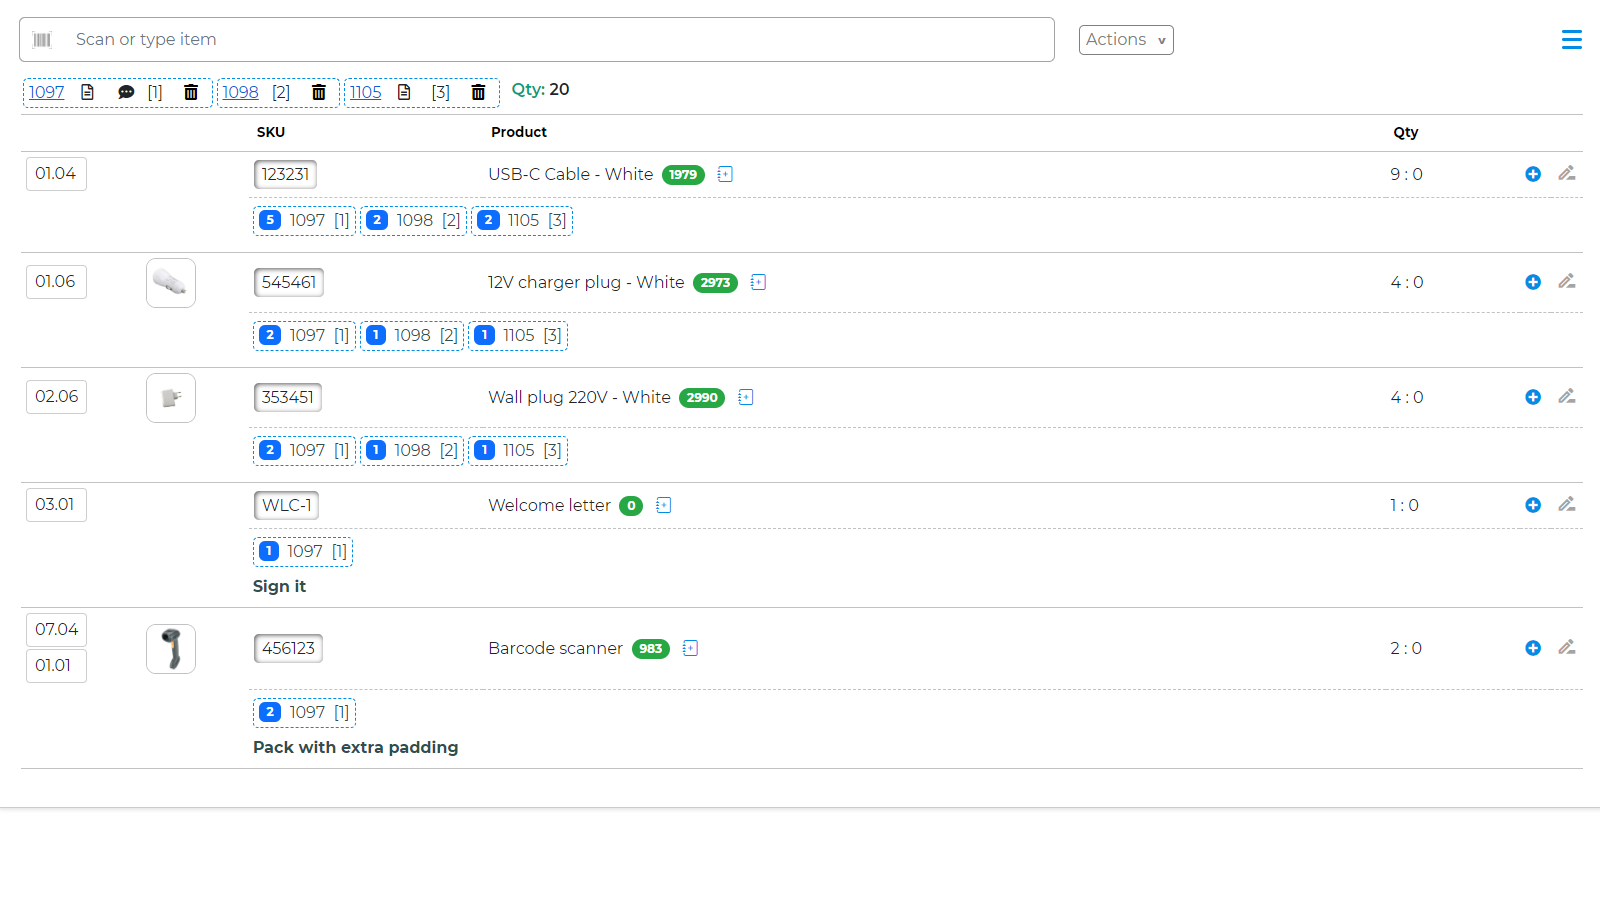
Batch picking list
If you’re using the picking box feature, the assigned picking box will be shown in square brackets after the order# in the header, and on each product line. Settings→View→Show picking box#
The quantity for each order is shown inside the circle beside the order# on each product line. The total quantity is shown on each product line in the Qty column. This can be turned on/off in Settings→Defaults→Hide order details in batch.
Bin locations are also shown in the Bin column if bin locations are turned on. Settings→View→Show bin location
The number of order barcodes per line in the header can be selected in Settings→Defaults→Barcodes per line in batch print. Useful is the barcodes are long and too close together.
The sellable quantity from Shopify can be shown (the number at the end of each order line).
Settings→View→Show available quantity in picking list
