With the Webshipper connector, you get a very powerful and flexible shipping label connector with automatic print of the shipping label after checking the order in iPacky.
About Webshipper
With a shipping solution provided by Webshipper, ecommerce businesses are able to automate and streamline shipping and logistics processes with just a few clicks.
By using a plug-and-play integration to a vast number of carriers, Webshipper enables companies to manage all shipping from their preferred system in one centralized hub including solutions for checkout, tracking and returns as well.
By simplifying shipping workflows, Webshipper reduces errors, saves time, and improves the overall customer experience. It is designed to scale with businesses of all sizes, helping managing the logistics efficiency and focusing on growth.
Webshipper is an nShift product allowing Webshipper to connect to the largest carrier library in the world.
With the iPacky Webshipper connector, you will stay in the iPacky interface all the time, and no need to switch to the Webshipper user interface.
It’s very flexible and powerful. Everything can go automatically, or you can change shipping methods, drop points, shipping address and multi parcel shipments. It also supports Shopify locations for shipping from different locations and partial fulfillments.
For this to work, you need PrintNode installed.
In order to use this connector, you need to have a working Webshipper Pro plan or higher subscription. The is because the Webshipper Essentials plan does not support API calls. In that case, contact iPacky. You must also have completed the setup in Webshipper with connection to Shopify so you have an order channel.
First, you must add the Webshipper connector in Connectors→Manage. After that, the Webshipper connector will appear when you expand the Connectors, and you can select it.
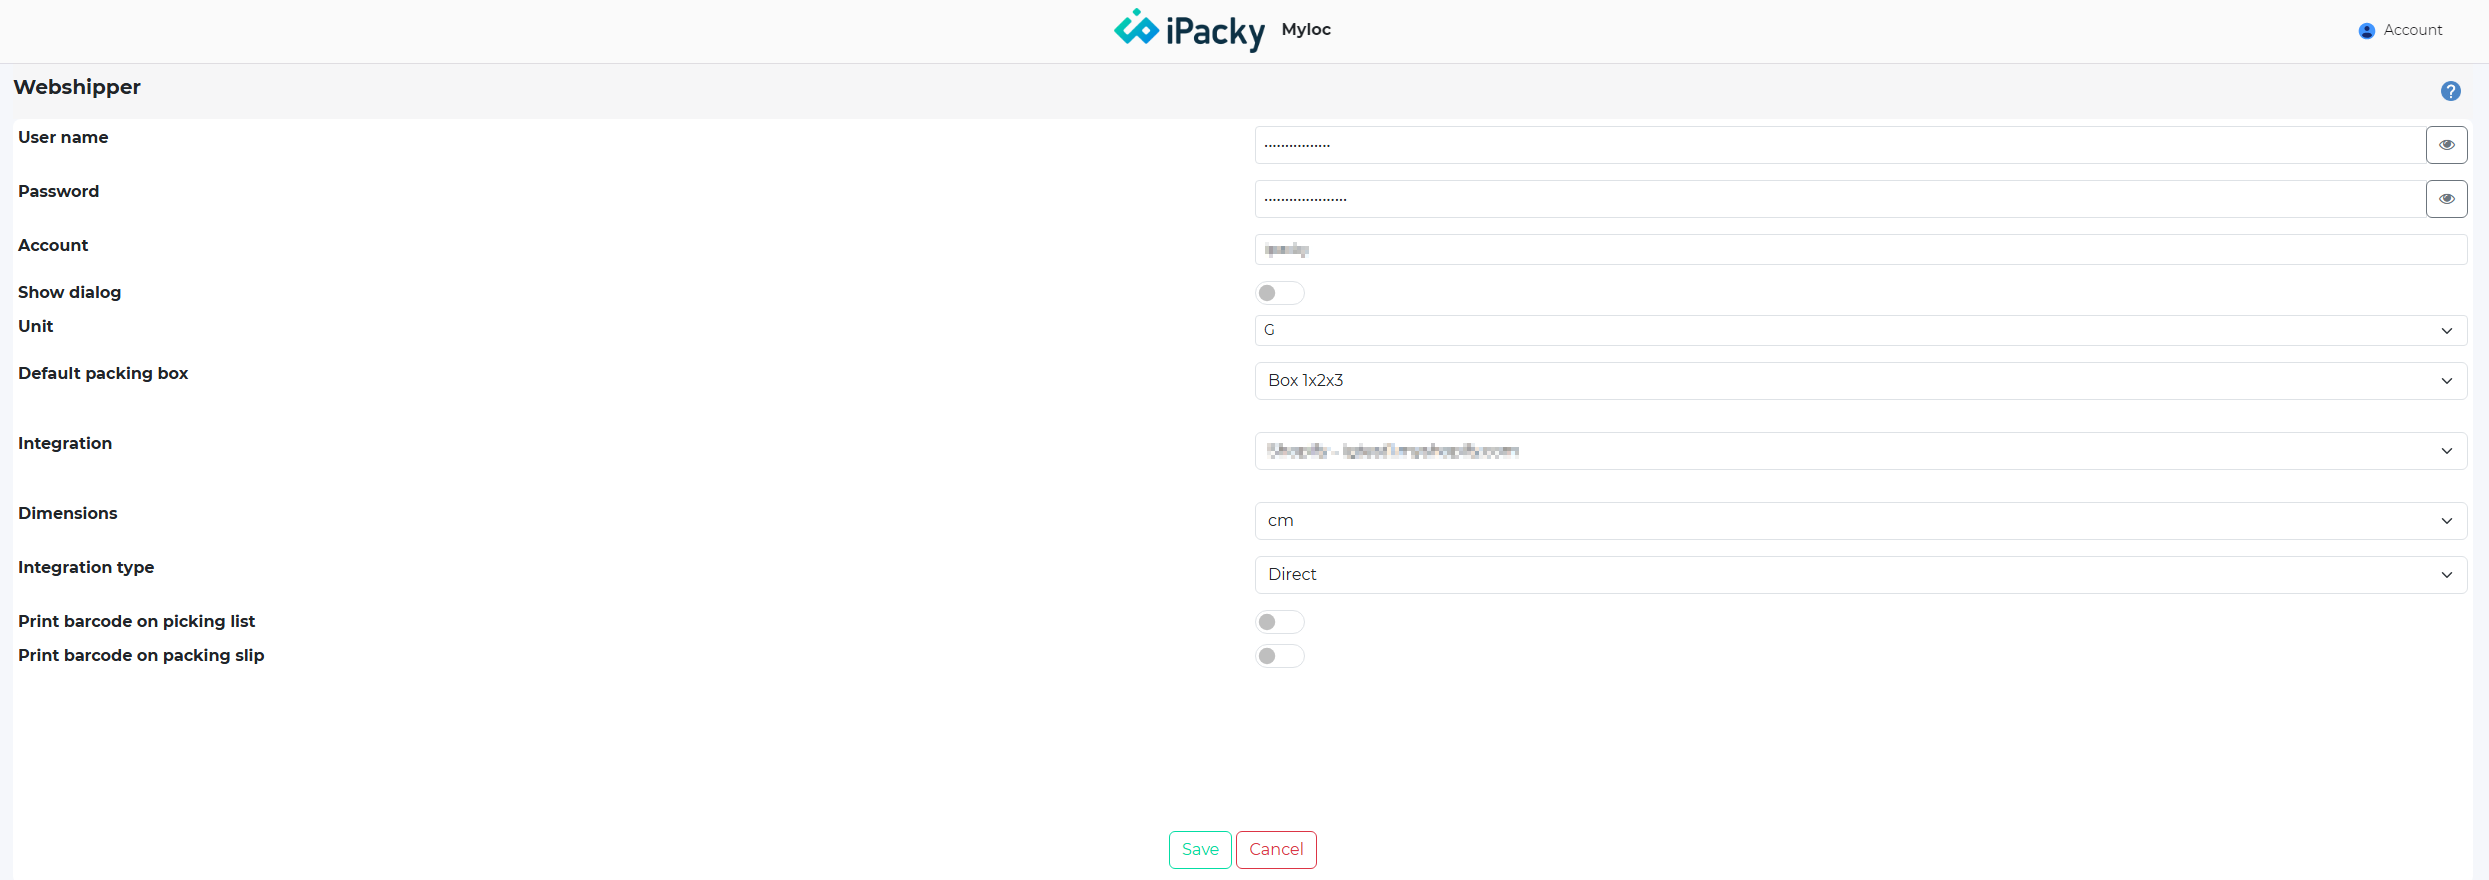
Setting | Description |
|---|---|
User name | The user name you use to log into Webshipper |
Password | The password you use to log into Webshipper |
Account | The account is the text before .webshipper.io in the URL address in your webshipper web interface. So if the address you see in the browser when you log into Webshipper is: https://mystore.webshipper.io, then the account is: mystore |
Address links | Only visible if you have set up iPacky to support Shopify locations. Here you will select the sender address for each Shopify location. The sender addresses must be defined in Webshipper. |
Show dialog | If the Webshipper dialog in iPacky should always be shown after the order check. If off, you can still select that per order in the Actions menu. Only applicable if the Integration type has been set to Direct. |
Hide get rates | If turned on, the Change button will be hidden in the iPacky Webshipper dialog, and it's not possible to change the carrier/services in this dialog. Useful if you don't want the workers to change the shipping. |
Unit | What unit should be used by iPacky on the weight. Only applicable if the Integration type has been set to Direct. |
Default packing box | Use Boxes to define your box sizes. Then you can select the default box size here. Only applicable if the Integration type has been set to Direct, and you must define at least one box, and set the default box. |
Integration | The is the order channel in Webshipper you want to use. It's usually just one. If nothing is shown, you have not completed the order channel setup in Webshipper. |
Dimensions | The dimension unit to use in the iPacky Webshipper dialog. Only applicable if the Integration type has been set to Direct. |
Integration type | Integration type is ignored if not set up with PrintNode and Fulfillment rules. Simple Will send a message to Webshipper to create the shipment and return the shippinglabel. You cannot do partial fulfillment, address changes etc. It will only use the data stored on the order in Webshipper. Webshipper is also responsible for fulfilling the order and writing the tracking info back to Shopify. Direct (recommended) If you select this you will have full control over the fulfillment process and shipping label production. You can do partial fulfillments, edit shipping address, changing parcel dimensions etc. iPacky is also reponsible for fulfilling the order and writing the tracking info back to Shopify. Read more below, |
Default HS code | The customs code to use if this in not on the product in Shopify. |
Default HTSUS code | The default customs code to use when sending to the US if this in not on the product in Shopify. |
Default country of origin | Two letter country code to be used when this info is not on the product in Shopify |
Integration type: Direct (Recommended)
If setting the Integration type to Direct, you will have complete control over the fulfillment process. In order for this to work, you must have PrintNode installed, and set the Fulfillment rules.
You must also do a setting in the Webshipper web-interface. Go to Connect→Shopify→Edit order channel. Turn off “Fulfill automatically”
You can do partial fulfillment by checking the items you want to send, and click Partial fulfill in the Actions menu in the order check screen.
If you have selected not to show the print dialog, iPacky will send the data to Webshipper and Webshipper decides what carrier/service to use based on
the rules set up in Webshipper. For many, this will be enough.
The iPacky Webshipper print dialog can be shown by either selecting Show shipping dialog in the settings here, or by selecting this in the Actions menu when checking the order.
The dialog can look like this:
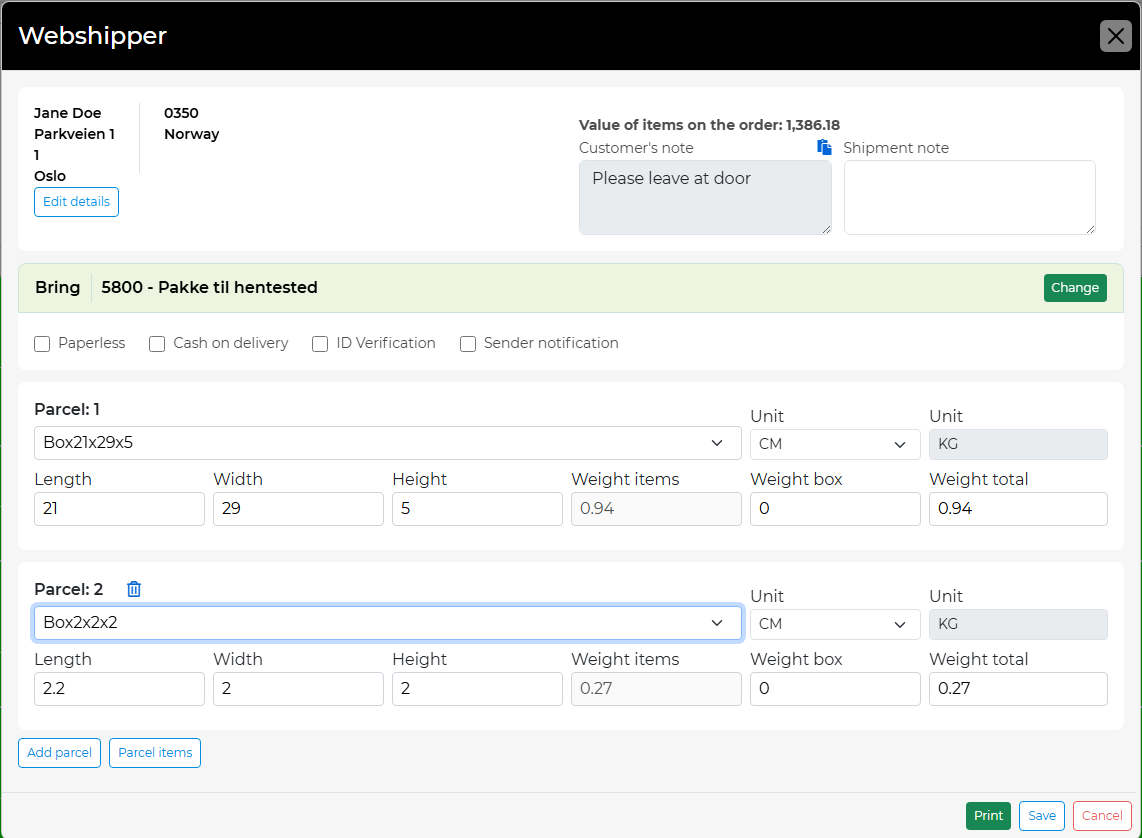
Here you can select the dimension and weight of the shipment. The Box drop-down shows the boxes defined in Dashboard→Tools→Boxes.
The Shipment note is used to write a note to the carrier. This might not be visible with all carriers.
Parcels can be added by selecting Add parcel. Delete it again by using the trash can icon. Please note that the carrier/service you have selected might not support multiple parcel shipments.
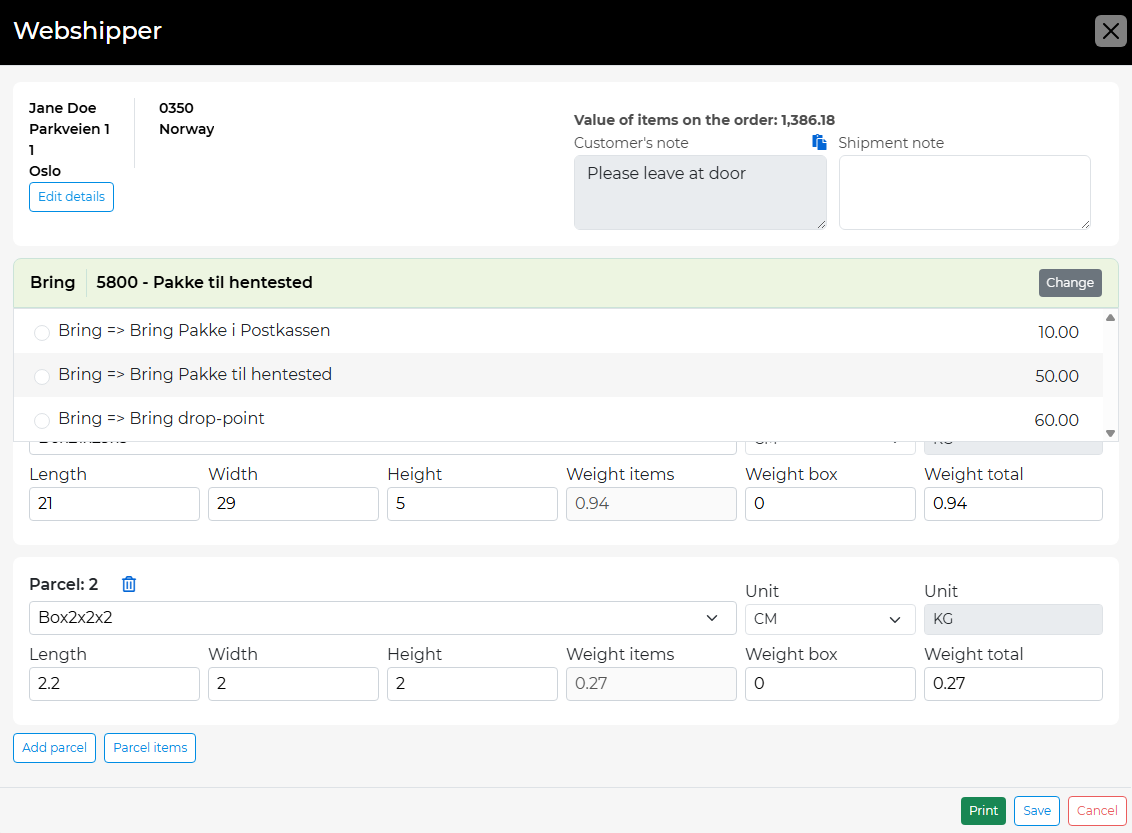
By clicking on Change, it will show the available carriers/services and the price. Keep in mind that not all of them might be valid for the order.
You can also select some properties of the shipment depending on the carrier/service.
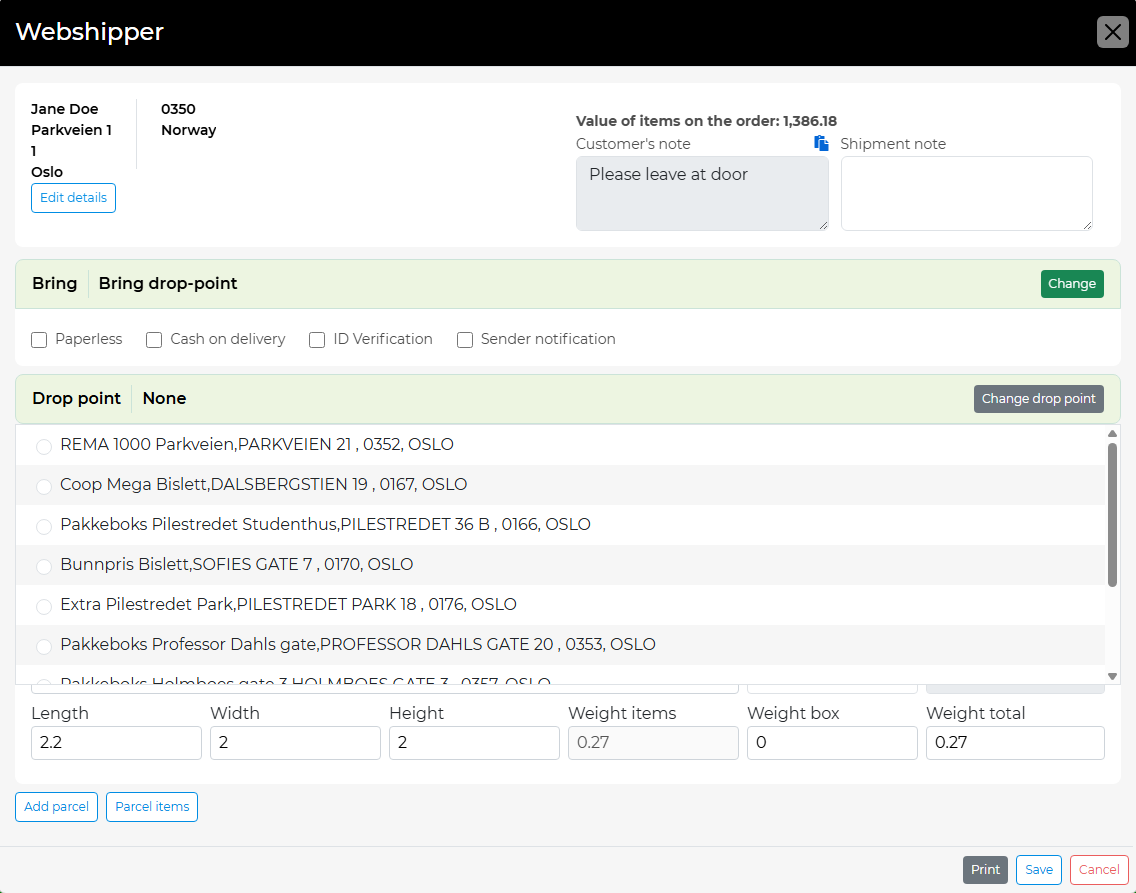
If the carrier/service supports drop point, you can also change this here by clicking on the Change drop point button.
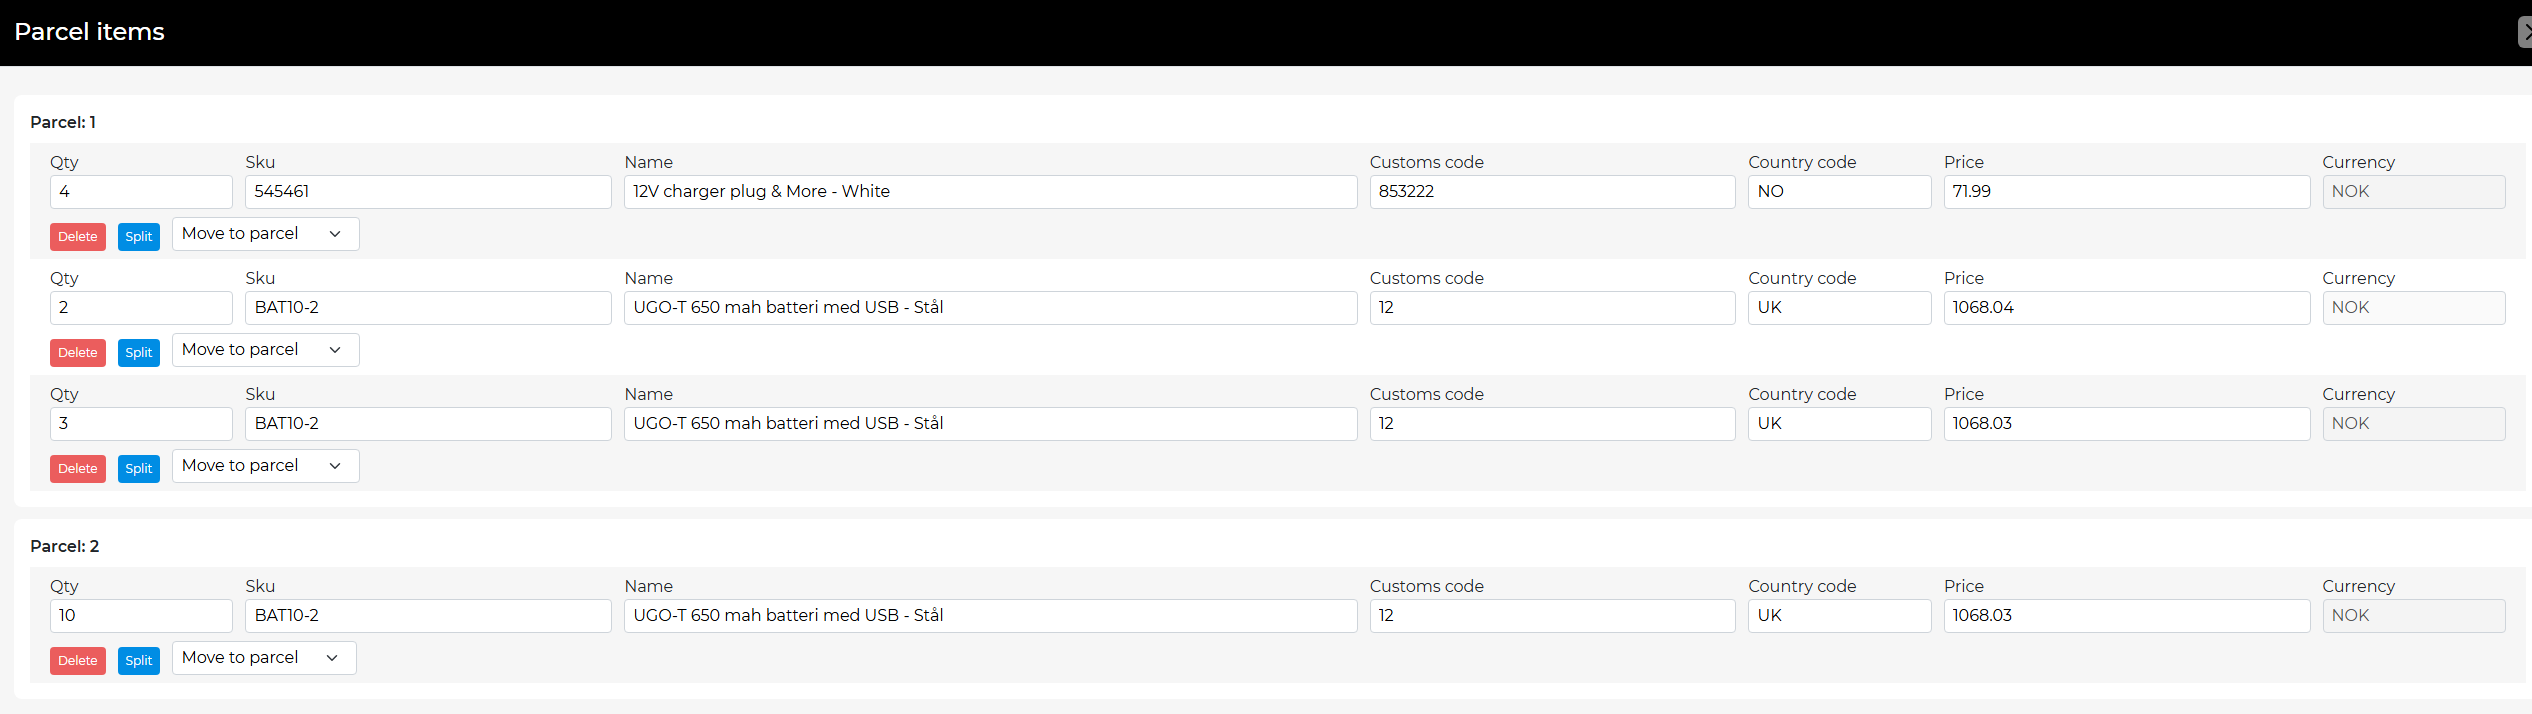
You can even move items between parcels if you have multiple parcels by clicking on Parcel items.
By clicking on Print, the shipping label will be produced. Clicking on Save will save the changes you have made, and you go back to the order check screen.
If an error occurs when creating the shipment in Webshipper, this will be presented to the user. The most common error is address mistakes. The shipping
address can be edited by selecting Edit details, and then you can retry the print.
If iPacky is set up to use Shopify locations, you will also have some drop-downs where you can select the sender address for each location. These sender addresses must be defined in Webshipper.
Note
If the shipping address is changed, and using drop point, it’s highly recommended to go into this dialog to select the correct drop point. Otherwise, Webshipper might select another drop point automatically.