This is the scan screen where you will do the actual checking of the order.
Lets you enter or scan the order number to start checking items. If you want to cancel the current order check, the Reset button resets the form.
When you open an order here, it will be locked and marked as in use, so that other users don’t check the same order. The lock expires after 15 minutes.
The video below does not have all the latest improvements/functionalities. If so, they should be explained in the text below.
Please note that the order will not be fulfilled in Shopify, but only tagged, unless you set this up in iPacky Dashboard→Tools→Fulfillment rules. This makes it 100% safe to test iPacky without fulfilling orders.
After you loaded the order, the screen can look like this:

The actual layout and options will vary based on the settings. This example is with kits/bundles (Bundles), bin location, packers note and product notes. And with Timeline turned on, and showing order tags.
Now, you can start the barcode scanning of the products (or manual check) to compare them against the order. Each order line shows the product, the ordered quantity, and the scanned quantity. When an order line is complete, it will turn green. Partially complete order lines will show as light blue with the number of scans shown after the colon, in the Qty column.
Element | Description |
|---|---|
Input field | Type or scan barcode or SKU. This will be matched against the order lines to see if it exists on the order. In order to accept SKU input, the Include SKU in scan must be turned on in Settings→Limitations. |
Actions | A drop-down menu with several choices:
|
Order info | Shows order number, when order was created and quantity. Quantity is the total number of items on the order. |
Note | If any order note from the customer, it will be shown here. |
Tags | List tags from order or customers specified in Settings→View. |
Timeline | Will list the last 5 timeline comments on the order if Settings→View→Show order timeline comments in turned on. |
Note from packer | Packer can write notes on this order. For example when something on the order is out of stock. This is a menu item in Actions. Read more about it. |
Bin location | If turned on in Settings→View, and not turned off for the user in User settings, it will show the bin location for optimized picking route. Bin locations are defined in Dashboard→Metafields. To sort on bin location, this can be set in User settings. |
Image | Show or hide product image is set in User Settings. By clicking on the image, it will expand to full screen. |
Qty | Shows the order line quantity : scanned quantity. |
Plus icon | Increment manually the scanned item quantity by one. |
Edit icon | Allows manual edit of scanned quantity. Very useful if the quantity is too big to scan, or the item does not have a barcode. By default, the suggested scanned quantity in this edit dialog will be the order line quantity. By setting Set default value of quantity edit to empty to on in Settings→Limitations the default suggested scanned quantity will be empty to force the user to enter a value. |
Box calculation | Will be shown if the Packing box calculation module is activated in iPacky. |
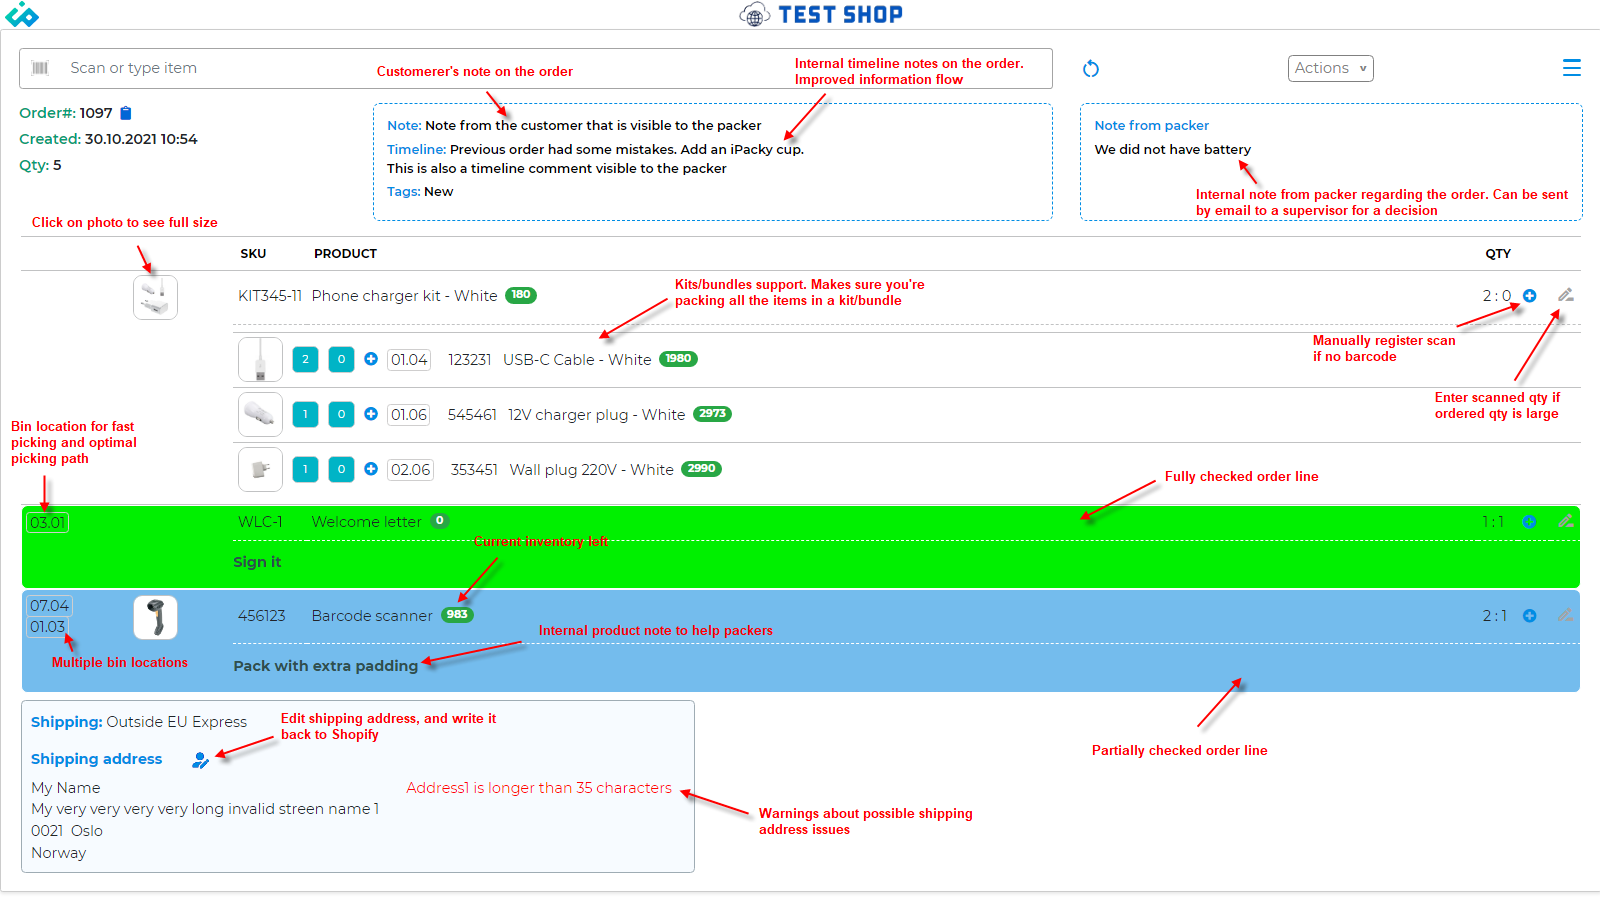
The green round pill after the product name shows the available inventory from Shopify. This can be turned on in Settings→View→Show available inventory in order check.
Ungroup virtual products
If using the order check screen while picking and using virtual products (bundles), you can turn on ungroup virtual products.
We strongly advise scanning each item using a barcode scanner if possible to avoid human mistakes.
Deny of manual edit of quantity and SKU enter can be done in Settings→Limitations.
You can even edit the shipping address on this screen, and it will be written back to Shopify. iPacky can even warn you about some basic address issues. Settings→Validate shipping address
When all items on the order have been scanned, the system will be ready to scan the next order. If there are any errors in scanning order lines, it will be shown on the screen (with sound alert). If the order is successful, then a checked tag will be placed on the order, which can be viewed in the order list in Shopify admin.
Useful options in User settings:
- Select the sounds for success, barcode, and failure events.
- Choose the font size in order lines. If you are reading the screen from a distance, this will make order lines easier to see.
- Show product image.
Useful options in Dashboard:
- Tools→Fulfillment rules. By default, the order will not be fulfilled in Shopify. Set up fulfillment rules if you want this.