PrintNode is software that allows printing directly to your local printer without user intervention. It also makes it possible to print from any device, such as Android/IOS.
This screen is available for Administrator role only.
Before activation, you need to get a PrintNode subscription. Printnode makes it possible for iPacky to print directly to your printers without any user intervention. The PrintNode client must be installed on the computers directly connected to the label or normal printer. If the printer is a network printer, you only need to install the client on one computer. This computer must be on and logged into in order for PrintNode to work.
In View PrintNode jobs you can see the status, do troubleshooting and even re-print.
Note: If you’re using Workstations that will override the printer settings done here.
Please read this document for detailed instructions of how to install
Please follow the next steps:
- Go to the PrintNode web page (www.printnode.com) and Sign up. You will use this login info in the PrintNode client setup.
- Download and install the PrintNode client on all computers necessary to have access to the printers you need. In the setup, we recommend that you DON’T select “Install as a service”. This can create some issues with using the wrong printer setup.
- Enter the PrintNode web interface and choose API Keys in the top menu. There, you can generate an API key.
- Copy the API key from PrintNode.
- In the iPacky Dashboard, select Connectors→Manage.
- Select Printnode from the dropdown, and click Add, and the Save.
- In the iPacky Dashboard menu, select Connectors and then the newly created Printnode entry.
- Click on the eye icon in our PrintNode connector, paste the API key from PrintNode in that field and save it.
- The list of printers will now be filled with the available printers from your PrintNode clients. If it’s not automatically filled, just enter this Printnode screen again.
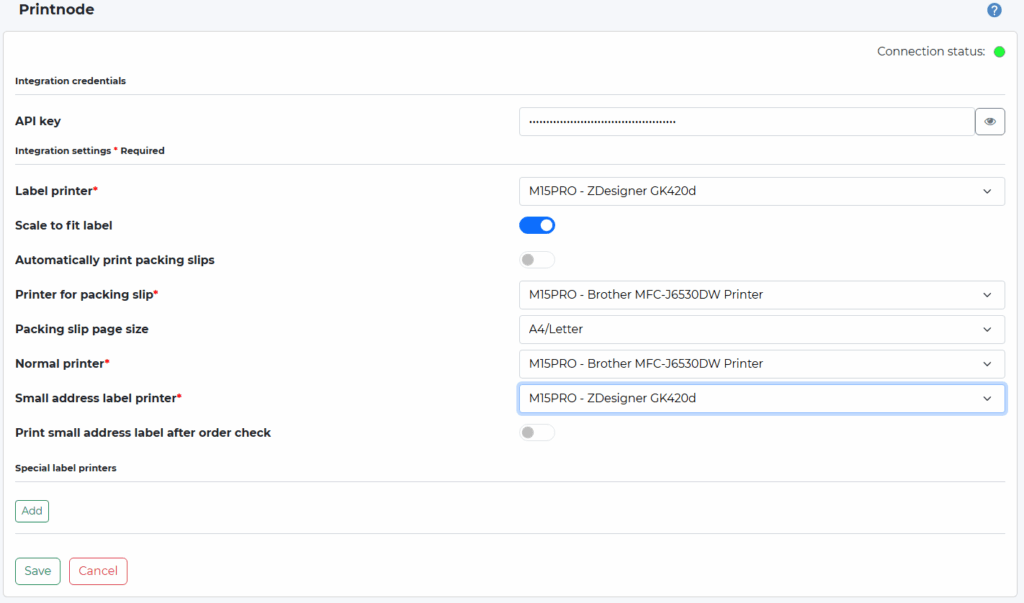
- Select the label printer, and the normal printer you want to use, and click Save. Scale to fit is recommended.
If you have several workstations with different label printers, this can be set up in Workstations.
When entering this screen the first time, you need to enter the API key, and click Save. If the key is correct, the connection status will be shown in green, and the other options are available.
Setting | Description |
|---|---|
API key | API key from PrintNode. |
Label printer | Select the shipping label printer to be used. |
Scale to fit label | Usually on. It will stretch the shipping label to fit the label of the label printer. |
Automatically print packing slips | If turned on, a picking slip will automatically be printed on the printer for packing slip after the order has been checked using the selected page size. This avoids pre-printing packing slips, and also supports partial fulfillments. The setup for packing slip layout is done in iPacky Dashboard→Settings→Packing slip. |
Turn off by default | If this is on, the packing slips will not automatically be printed after the order check, but can be turned on for the current order during the order check. Actions→More→Packings slips with PrintNode |
Printer for packing slip | This is the printer that will be used when automatically print packing slips, and if selecting Packing slips with PrintNode in the Packing lists/Packing slips screen. If you are setting up Workstations, the settings there will override this setting. Must be selected. |
Packing slip page size | Select the page size for picking slips. It can be A4/Letter or 102x152mm/4x6in (Shipping label). This last one makes it possible to print out on smaller media, like the shipping label size. Make sure that you're not using the wrong page size. It will scale to the format selected on the printer. If you are setting up Workstations, the settings there will override this setting. |
Normal printer | Normally an A4 printer. Seldom used, but must be selected. |
Small address label printer | The printer to use for small address labels, NOT shipping labels. This is usually not used, but must be selected. Only when printing out address labels for shipments with stamps. |
Print small address label after order check | Prints the small address label after order check automatically. This is usually not used. Only when printing out address labels for shipments with stamps. |
Special label printers | Only used with the Ship&Co shipping connector. Read the documentation on that. |

