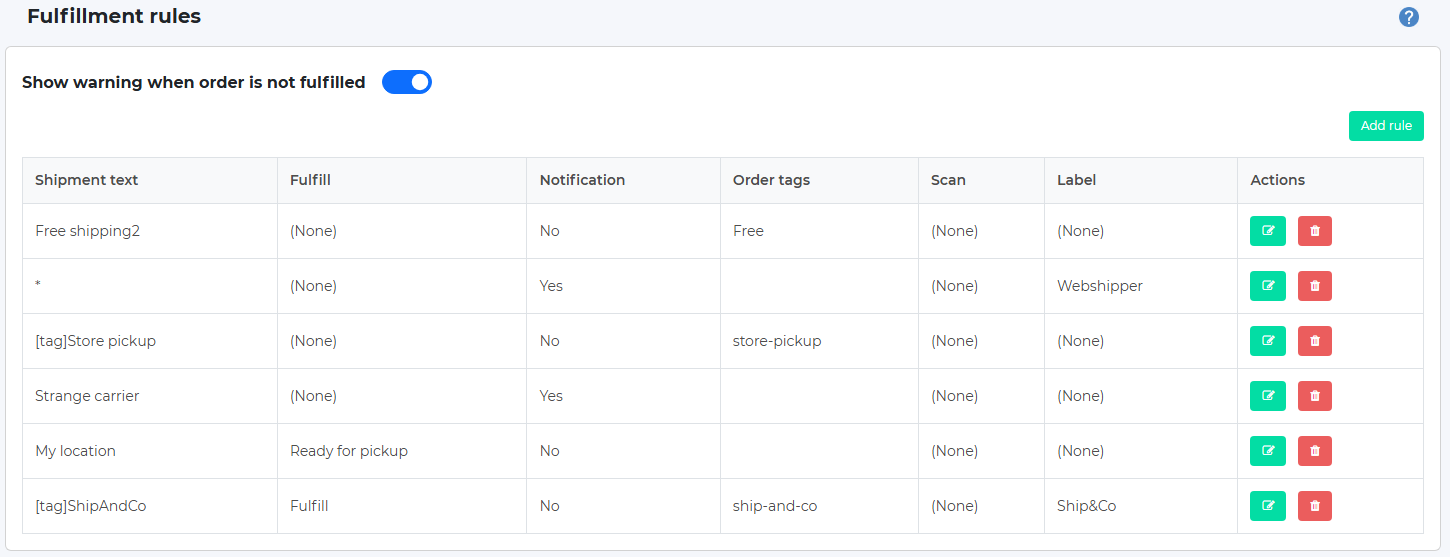
Users with Administrator role can specify fulfillment rules based on the delivery type that was selected on the order during checkout.
iPacky will not fulfill the order in Shopify unless a rule is set here!
iPacky Dashboard→Tools→Fulfillment rules
If the setting Orders are fulfilled before iPacky is turned on, the settings here will be ignored (except Ready for pickup), because they will have no meaning.
These settings decide how and if orders will be fulfilled by iPacky, and possibly sent to a shipping connector or a custom URL.
This makes it possible to fulfill orders or open a URL based on criteria as shipping type and order tags.
The Show warning when order is not fulfilled will show a warning on the order check screen if the order fulfillment fails/not fulfilling. Not recommended if not all orders are supposed to be fulfilled by iPacky.
If you only want to fulfill all the orders you check in iPacky, and do not connect to any of our shipping connectors, just use: * in Shipment text, select Fulfill in Fulfill and Yes in Notification.
Field | Description |
|---|---|
Shipment text | The shipment text is the text shown to the customer at checkout, or the name of the location if click and collect. * in the Shipment text means everything else that has not been specified. Like a catch-all not listed. Putting [tag] in front will check on an order tag instead of a shipment text. For example: [tag]No ship [[NoShipping]] specifies no shipment text. You can also add * at the end of the Shipment text. That means match everything up to that point. So Test* would mean everything that starts with Test The shipment text is case-sensitive. So usually best to use the Copy to clipboard function, and paste it in here. |
Fulfill | What should be done with this rule. Ready for pickup, Fulfill or (No). If using Custom URL this should most likely be No. |
Notification | Specifies if Shopify should send a notification to the customer when it's fulfilled. If you connect to one of our shipping apps, it might be that that one is set up to send track&trace instead for better branding. Not available when Ready for pickup is selected. If using Custom URL this should most likely be off. |
Order tags | Usually not used. Specify which tags should be added to the order when this rule is executed. Normally not used. Only used if you want to add tags based on a specific rule being executed. |
Scan | Usually not used. In Scan you can specify if you want to scan anything after order check. Normally this is unchecked. One reason to use it (Tracking#) is if you share a label printer with several workstations and want to make absolutely sure that you are using the correct shipping label. You can then scan the barcode on the shipping label to make sure you are using the correct one registered on the order. Not available when Ready for pickup is selected. |
Label | Specify which shipping connector to use. It will show (None) if no shipping connector is set up, or Printnode is not set up. Not available when Ready for pickup is selected. Instead of a label, you can also select a custom URL to open if this rule kicks in. Read more about Custom URLs. |
Shopify shipment texts are all the available shipping rate texts in the Shopify admin, and local pickup locations. By selecting a text here and clicking on Copy to clipboard, you can then paste this text into the Shipment text. That way you can be sure you don’t make spelling mistakes.
The order of these rules is irrelevant.
To add a rule, fill in the fields in the Add rule section.
Shipping labels in Shopify
If you’re using Shopify built-in shipping label creation, and want to produce the shipping label after order checking (recommended), please follow these steps:
- Make sure that the setting for Orders are fulfilled before iPacky is switched off. Dashboard→Settings→General→Orders are fulfilled before iPacky
- Set up the shipping rules described above. The Label should be set to None
- Turn on iPacky Dashboard→Settings→Advanced→Open order in Shopify after checking. Or use Custom URLs.
- If you want to support partial fulfillment, also turn on iPacky Dashboard→Settings→Limitations→Allow partial fulfillments
The workflow will now be that you check the order in iPacky. After completely checking an order, the order will be fulfilled/partially fulfilled by iPacky, and the order will open in Shopify in a new tab in the browser. From there you can produce the shipping label.

